The Product

I was chatting with one of the owners of Illumn and we realized this hadn't been fully tested by anyone yet, so he agreed to send one my way.
Spoiler
Power banks with replaceable cells are super exciting for me. They help me combine some of my frequently carried gear - spare batteries, a charger for them, and a power bank for my phone and other portable devices.
This ticks a lot of boxes - a detailed display, two USB outputs, reasonable charging rates (for both the cells and a connected device), and it's fully enclosed so I can stuff it in a bag. I also love that it isn't picky about cell size. 4 bays might be a bit large for some, but if you need the capacity this is a great bet to have up to 14000mAh of power on the go.
My only complaint about this is the ports - a USB-C port in lieu of the outputs and one of the inputs would be a nice upgrade, since this is what most modern devices are using. Micro-USB is really only used for cheaper accessories in 2019, and I don't expect to see it become more popular in the future. The good news is that, when a charger with the updated port comes around, I'll still be able to use the same cells I have in this one!
Physical Dimensions
The charger measures 86.3 mm wide, 113.4 mm tall, and 27.1 mm thick.
 The springs allow the bays fit everything from a flat top unprotected cell, to a protected button top. There's no support for cells other than 18650.
 For comparison, here's the F4 lined up with a few other power banks and combo power banks of mine - the Armytek Handy C1 Pro (single bay with NiMH support), Rofis MR30 (21700 flashilght combo), XTAR PB2 (2x18650), and XTAR PB2S (2x21700 with USB-C).


Build
Like most chargers, this one is built from black polycarbonate.
 The front cover has a textured section to help slide it up and access the bays, and a cutout for the display.

 Both sides are bare, and the bottom doesn't have any features of note except the name and specifications molded into it.
 The top of the charger houses all the interesting bits - a micro-USB input, two USB-A outputs, and the button.
 Around back, there's not much to see.
 The cover clicks shut, but pushing on the textured section allows you to slide it up to access the bays. The cover itself feels a bit flimsy, but when it's installed the unit as a whole is solid enough.
 When open, you can remove the cover completely - but there's certainly no risk of it sliding open or popping off unintentionally in normal use.
 Each bay has the polarity clearly marked, with a steel positive contact and a long spring on the negative end.


What's Included
Charging
Display and Interface

The display shows the rough level of charge for each of the 4 cells, with some additional details about the selected bay - the cell voltage is always shown, and the current into or out of the cell, alternated with the total mAh that have been charged or discharged. the indicators at the top right show which USB outputs are currently in use.
Pressing the switch once turns on the back light, and further presses cycle through the bays.


Charging

Fully loaded, and measuring the first bay, you can see that the charger tops the first cell off before moving on to the rest. It seems as though the charger prioritizes the bays in order, but sends some current off to the others - so by the time it gets to the last bay, just a quick top-off is needed. In any case, termination is good, the maximum charge current matches the spec, and the complete charge of all 4 cells (two 3000 mAh and two 3500 mAh) takes under 8 hours, which is respectable.
The jumps up seen in the USB current seem to show that the charger is prioritizing certain bays at different points in the cycle. It's reasonable to try and get the cells in the first bay topped off first, so they're ready to go, but I wish the charger was capable of distributing the full 2A input for the entire charge - i.e. I wish the USB current stayed at 2A and dropped slowly, spreading the current to more bays instead of dropping down to 1A and then popping back up.
 Charging two cells doesn't have the same strange fluctuations in USB current. The max charge rate is 1A per cell, but seems to pulse.
 Charging an individual cell doesn't impact the current going into it - still a maximum of 1A, with the same pulsing.


Power bank

Increasing the current by 0.1A every 30 seconds shows the power bank will happily deliver more than the rated 2.0 amps from a single port - the voltage started to drop from a single cell at 2.3A, and from 2 or more cells at 2.7A. I didn't observe any true over current shut off up to 4 amps (the limit of my tester). I didn't test the capability from both ports at once, as I only have one load.

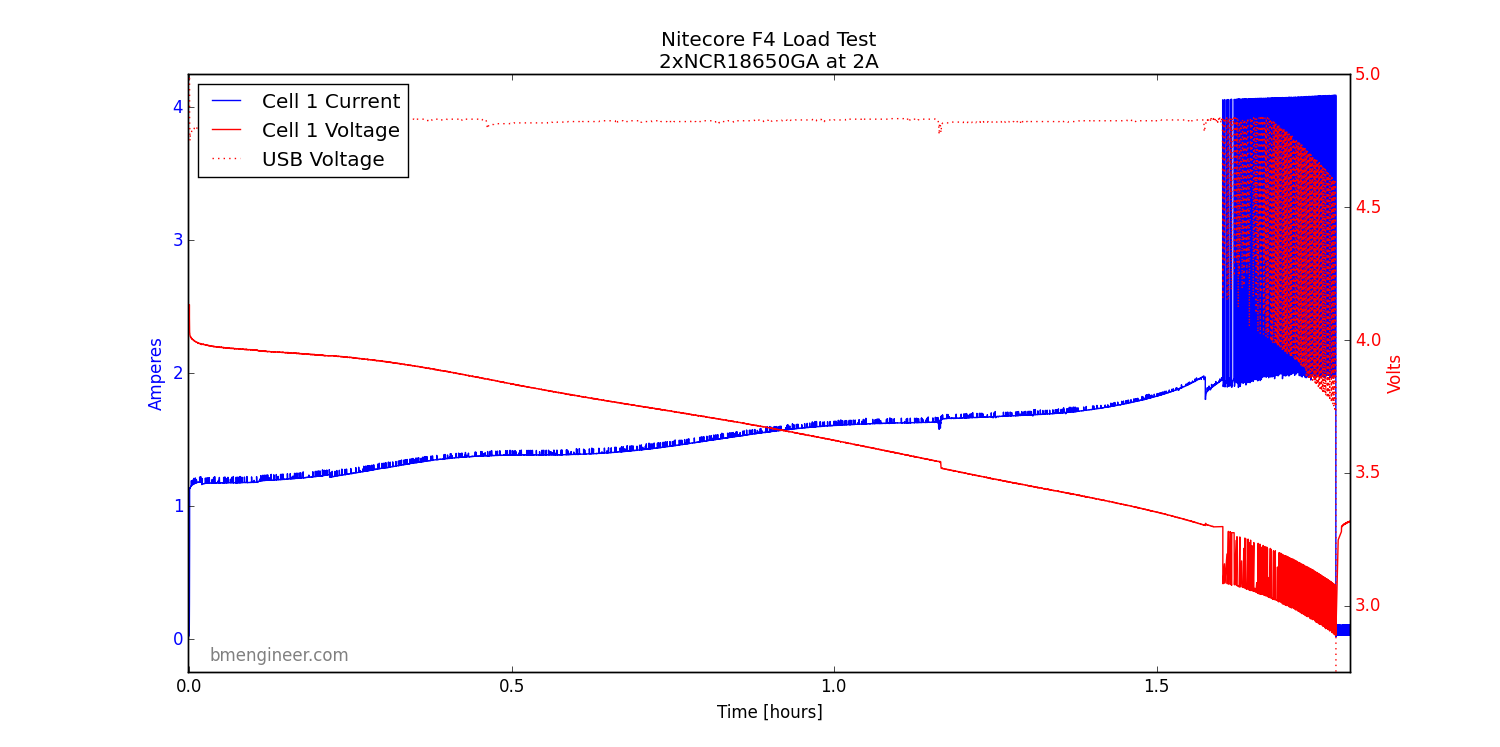
Measuring the voltage and current of the first cell while pulling 2 amps from the power bank gives an interesting looking graph, but there's lots to see here. The current pulled from the cell increases as the cell voltage drains, to keep the boosted output voltage steady. When the voltage hits about 3.15V on this cell, the power bank switches to the others. It comes back a few times to see if these have more juice in them, but mostly leaves them alone until the others are drained - then it will drain the cells down to 3.0V. This is a great algorithm to try to avoid unnecessary cell wear.
There's a weird portion in the middle where the current is actually flowing into the cell. I'll be honest and say I don't have any real ideas what's going on here. It's about 0.15A at most, and shouldn't have any negative effects, but I wouldn't expect anything to be happening at all for this period.
 With only two cells installed, the last few minutes are a bit messy - the charger is trying to alternate between the two cells, but each is sagging under the load. The result is quite a bit of fluctuation of the output voltage, which may cause issues charging some devices.

With a single cell, there's no bay switching to handle, so the LVP is much cleaner, and the output is more stable at the end. Note this draws up to 4A from the cell, so you'll need fairly high draw cells to use this power bank at its full capacity.

Teardown
The wording for this section was chosen very carefully - this is a teardown, not a guide. If you do this, you could very well break your device and will definitely void your warranty. I do this to show you what's inside and learn how the device works.


- Mini58ZDE MCU
- A bank of four CN3153 linear charge controllers
- A set of two FP6276B DC-DC boost controllers
Summary
Pros:
- Fits 1-4 18650 cells, and isn't picky about their length
- Dual outputs is a nice addition for a power bank of this size
- Fully enclosed - this is mandatory for anything I want to be able to chuck in a bag with cells installed
Cons:
- High standby current
- A USB-C port should be used in place of the micro-USB input and one of the two USB-A outputs
Notes and Links
This product was provided free of charge from Illumn. I was not paid to write this review, and have tried to be as unbiased as possible. All charging measurements were recorded with version 2.0 of my measurement setup, or some variation of it.
Nitecore F4 product page at Illumn.
Zeroair's review of the F4.
Nitecore F4 product page at Illumn.
Zeroair's review of the F4.
Comments
Post a Comment