The Product

While Nitecore has a whole lineup of lanterns, this is their first model that has replaceable cells and built in charging, as well as their first that doubles as a power bank.
Spoiler
I carry a powerbank with me quite often - when I travel, on backpacking trips, and sometimes just around town. I always prefer to bring one with replaceable cells as well. The LR50 works great as a powerbank, while serving double duty as a lantern or emergency light. It's water resistant, high CRI, and has a magnetic base - three of my favorite features in any light.
The UI is simple, and the configurable beam direction is useful as well. It's been jostling around my bag for over a week now, and the two-button press required to power it on means it hasn't turned on when I didn't want it to.
I'm not a fan of the two bays being wired together, and when I opened mine up one of the wires was damaged to the point that it could be dangerous. Hopefully this is limited to my sample.
Physical Dimensions

Build


Two latches at the sides release the diffuser clips. There's an o-ring seal where it meets the base.

Removing the diffuser gives you a look at the innards. There are 3 SMD LEDs on either side and another 3 on the top, and when the diffuser is removed they are bare. The two cell bays take up most of the volume.

Each bay has a sticker indicating polarity and supported cells. The negative contact is a spring.

The positive contact is a slightly depressed brass button, so flat top cells are not intended to be supported.
What's Included
Ergonomics and Retention

Finally, there's a magnet in the base that's just strong enough to support the weight in any orientation. When attached with the magnet, the contact made by the rubber port cover comes in handy to stop the light from sliding around.
Modes and Interface
- Both sides and the top illuminated
- Top illuminated
- One side illuminated
- Top and one side illuminated

The UI is controlled by two identical switches, and works as follows:
- From off, pressing either switch indicates remaining charge (1-4 flashes)
- From off, hold both switches to turn on the lantern in the last used direction, low brightness
- Continue holding to cycle to full brightness beacon and SOS modes
- From on, press either switch to cycle brightness
- From on, hold either switch to cycle directions
- From on, hold both switches for off
- Continue holding to blink the blue indicating LED every 2 seconds as a locator
This UI is good for the device and features it has. I wish there were a few additional brightness levels - perhaps a lower 1 lumen mode and a higher mode, but overall it's good. I'm always impressed when manufacturers manage to add features like the configurable light direction without messing up basic use of a light. It's also possible to activate fewer directions and get a lower overall output as a result.
Note that the two blinking modes do not have adjustable beam direction or brightness.
Note that the two blinking modes do not have adjustable beam direction or brightness.
Light Quality and Beam

The beam is a bit interesting. Since the LEDs are down each side, with none along the edge, it doesn't put out a 360 degree beam if it's sitting on a table. If it's hung from above, the top emitters help to even out the beam. There is no visible PWM on any mode, which is excellent to see - a lot of other lanterns I've tried suffer from this.
Power and Runtime
The manual says not to use mismatched cells. With my DMM, I measure continuity across the two negative contacts and the same across the two positive contacts. Additionally, measuring the voltage across the the empty bay when one cell is inserted shows the cell voltage. As best as I can tell, it seems like the cells are directly in parallel. This is fine as long as users are aware of it, but be sure to heed the warnings in the manual and not mix chemistries or charge levels (different capacities are likely fine). I would have preferred independent bays - one of my use cases for this product is as a powerbank on a backpacking trip, and it's nice to be able to swap out a cell for the one in my headlamp if either device is running low.
Standby drain with a single cell was measured at 196 uA. I was unable to get a good reading with two cells installed, but all evidence suggests it should be the same - that means two 3400 mAh cells would drain in about 4 years if left alone.

Charging

Behaviour was almost identical with a single 3500mAh cell, pulling 16.4Wh over USB.
Power Bank
To use the power bank function, just plug a USB device into the USB-A port in the bottom. The indicator LED will turn on to indicate it's in use. Nitecore states the powerbank can supply up to 2.1A.
 A constant current load of 1A didn't have any issues keeping the voltage healthy, and drew 21.44Wh from two 3400mAh cells, 10.50Wh from a single 3500mAh.
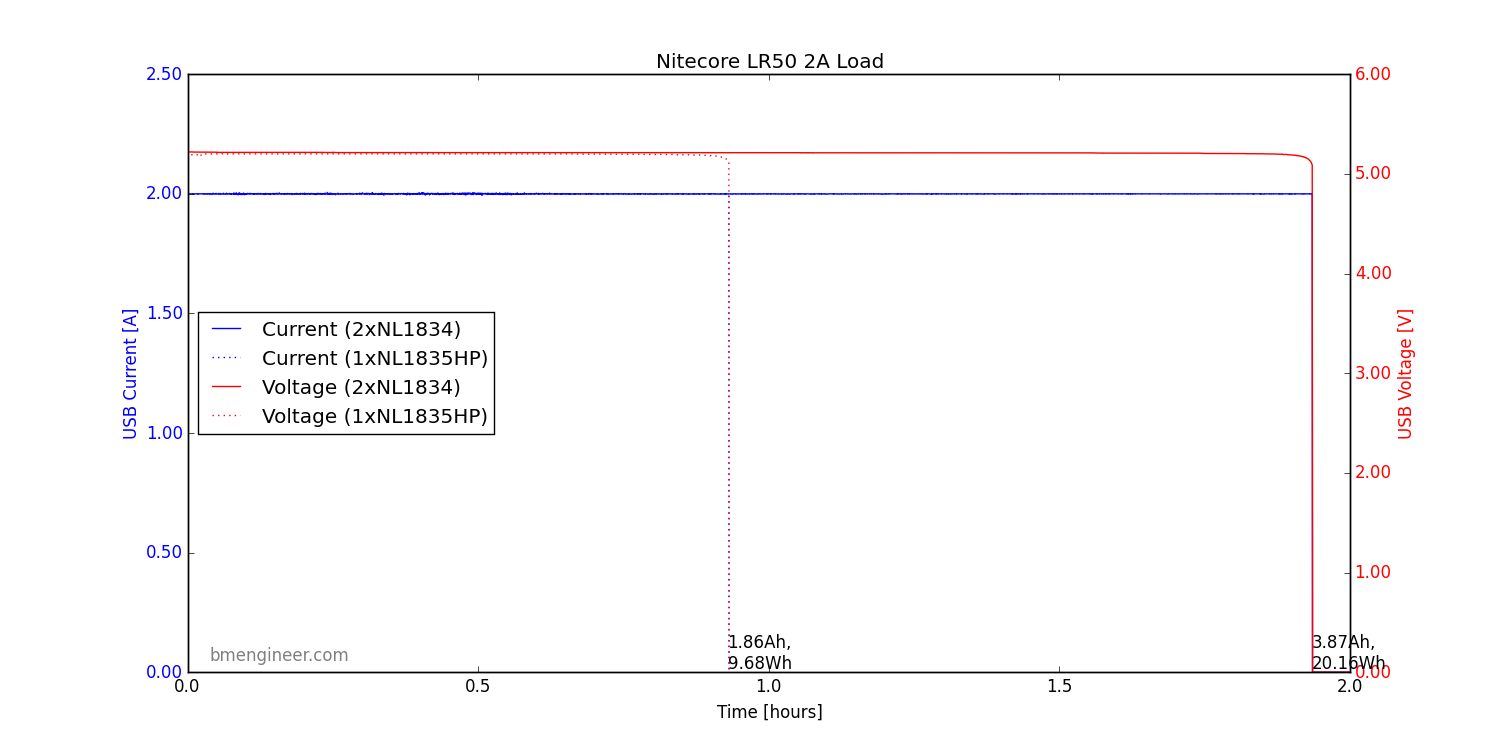
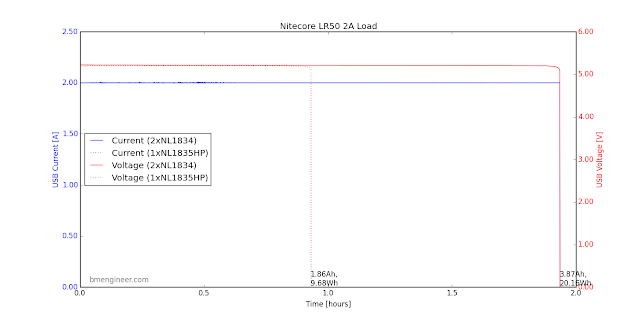 Repeating the test with a 2A load, the power delivered from 1 and 2 cells is 21.16 and 9.68Wh, respectively. Nice to see no major loss in efficiency at the higher loads.
 Currents of up to 2.1A are supported, but a quick load sweep shows that the powerbank doesn't cut off up to 4A (that's as high as I can test with my load). The voltage from a single cell dropped below the acceptable 4.75V at the upper end of the test.
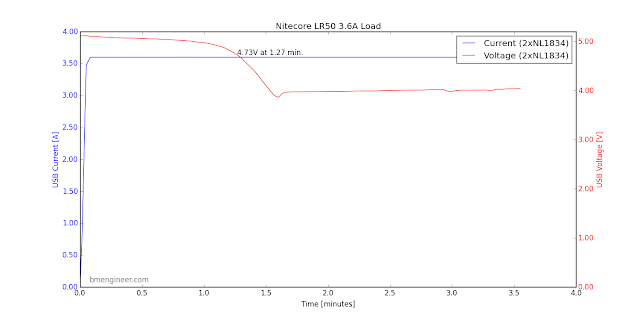 Trying to pull that much current for any sustained amount of time isn't a good idea - a 3.6A load from two cells shows the voltage falling out of spec after a little over a minute, settling closer to 4V. The unit didn't get noticeably hot on the outside, but something smelled a bit toasty - it's possible that was the small constant current load I use as well. I would have liked to see improved over-current protection here. Fortunately, most common devices like cell phones won't try to charge at this rate anyways.


Teardown
The wording for this section was chosen very carefully - this is a teardown, not a guide. If you do this, you could very well break your device and will definitely void your warranty. I do this to show you what's inside and learn how the device works.


Getting into the charger is easy enough - I popped the plugs out with a tiny flat screwdriver, and removed the screws with a #1 Phillips. Four more #0 Phillips held the button boards in place, and then it was all laid out.

The first side of the driver board houses the MCU, the USB-A port, Bat+ and Bat- leads, and a large inductor. he two green wires shown lead to one of the switches, and the jumble of wires on the left hand side is for the 3 lantern directions, the indicating LED, and the common ground.

On the reverse side of the driver there are two smaller inductors, the micro-USB port, and the wiring for the second switch.

There's a board installed in the 'head' of the light with a few smaller components, and a removable connector for all the LEDs.

Unfortunately, the negative lead going to the cells is damaged on my sample. I was initially concerned that it melted during my over current tests. Nitecore assured me that this was an assembly error and not damage as a result of my testing - even so, if the positive lead were to be damaged in the same way, this could lead to a dead short inside the lantern. I hope that this is an isolated occurrence, and that other samples don't show the same damage.
Summary
Pros:
- Good form factor combines a slim build with high capacity
- Dual lantern and powerbank features are a useful combination
- Warm white, high CRI beam is excellent for a lantern
- Configurable directions let you use the lantern as a work light or reading light without wasting power throwing light in directions you don't need
- Magnetic base and bail for hands-free mounting
- Flexible power options
Cons:
- Damaged insulation on the leads is a dangerous defect in my sample
- Over current protection doesn't seem to work very well
- Cells bays seem to be directly in parallel - independent bays would be preferable
- I would have preferred a USB-C port over the micro-USB
Notes and Links
This product was provided free of charge from the manufacturer. I was not paid to write this review, and have tried to be as unbiased as possible.
Manufacturer's product page
Product page on Amazon (affiliate link)
Manufacturer's product page
Product page on Amazon (affiliate link)
Comments
Post a Comment